ARIMA
Learn how autoregression, differencing, and moving-average error terms combine into one unified model you can fit, diagnose, and forecast with.
Written and reviewed by Shreyash Prashu Last reviewed
What you'll learn
- AR(p), differencing d, and MA(q): what each parameter controls and why they are combined
- The Box-Jenkins workflow: stationarity check, ACF/PACF identification, fitting, residual diagnostics, forecasting
- How to use statsmodels ARIMA, interpret AIC/BIC, and verify that residuals look like white noise
Before you start
The last three lessons built the pieces separately:
- differencing to kill a trend
- AR for the persistence of levels
- MA for the reverberation of shocks
This lesson bolts all three into one model — the workhorse of univariate forecasting — and, just as importantly, the disciplined workflow for using it without fooling yourself.
What ARIMA is
ARIMA(p, d, q) stands for AutoRegressive Integrated Moving Average. The three letters encode a recipe:
- Difference the raw series
dtimes until it is stationary. - Fit an AR(p) + MA(q) model on that differenced series.
- Integrate back (reverse the differencing) to get forecasts in the original units.
The word “integrated” here is the inverse of differencing: if you difference once to remove a trend, you integrate once (cumulative sum) on the way back out.
The three parameters
| Symbol | Name | What it controls |
|---|---|---|
p | AR order | How many of the series’s own past values feed into today’s prediction |
d | Differencing degree | How many times to subtract consecutive values to achieve stationarity |
q | MA order | How many past forecast errors feed into today’s prediction |
An ARIMA(1, 1, 1) model says: difference the series once, then predict with yesterday’s differenced value plus yesterday’s error.
Stationarity and the role of d
A stationary series has a constant mean and variance over time. Trending or drifting series are not stationary, which breaks ordinary AR and MA fitting.
Differencing once removes a linear trend; differencing twice removes a quadratic one. In practice d is almost always 0, 1, or 2. Choosing d too large is a common mistake — see the warning below.
The Box-Jenkins workflow
George Box and Gwilym Jenkins formalized a five-step loop that remains the standard approach for fitting ARIMA models:
Step 1 — Make the series stationary (choose d).
Plot the series. If it trends, compute the first difference. Run an Augmented Dickey-Fuller (ADF) test or KPSS test. Repeat until the test indicates stationarity.
Step 2 — Identify p and q from ACF and PACF.
- The autocorrelation function (ACF) measures correlation between the series and its own lags. An MA(q) model cuts off after lag
q. - The partial autocorrelation function (PACF) removes the influence of intermediate lags. An AR(p) model cuts off after lag
p. - In practice the patterns overlap, so treat ACF/PACF as a starting point, not a rule.
Step 3 — Fit the model.
Pass (p, d, q) to your fitting routine and estimate the parameters by maximum likelihood.
Step 4 — Diagnose residuals.
This is the step most beginners skip — and the most important. If your model has captured all signal, the residuals should look like white noise: zero mean, constant variance, no autocorrelation. Check:
- A residual ACF plot: no spikes outside the confidence band.
- The Ljung-Box test: a significant p-value means autocorrelation is still present and your model is underfit.
Step 5 — Forecast.
Call .forecast(steps=h) for an h-step-ahead forecast. Uncertainty widens with horizon.
Model selection: AIC and BIC
When comparing candidate orders, use the Akaike Information Criterion (AIC) or Bayesian Information Criterion (BIC). Both penalize models for complexity. Lower is better. BIC applies a heavier penalty for extra parameters, so it tends to favor sparser models.
A practical shortcut is pmdarima.auto_arima, which searches over a grid of (p, d, q) values, runs stationarity tests automatically, and returns the order with the lowest AIC. It is a useful starting point, but always inspect the residuals of whatever it returns.
The ARIMA pipeline — diagram
The ARIMA pipeline: difference → AR+MA fit → integrate back → forecast (widening band = growing uncertainty).
Fitting ARIMA in Python
The code below shows the full Box-Jenkins pipeline using statsmodels; run it locally in any Python environment with pip install statsmodels.
import pandas as pd
import matplotlib.pyplot as plt

from statsmodels.tsa.stattools import adfuller
from statsmodels.graphics.tsaplots import plot_acf, plot_pacf
from statsmodels.tsa.arima.model import ARIMA
from statsmodels.stats.diagnostic import acorr_ljungbox

# --- Step 1: load and inspect ---
series = pd.read_csv("monthly_sales.csv", index_col="date", parse_dates=True)["sales"]

# ADF test for stationarity
adf_result = adfuller(series)
print(f"ADF p-value: {adf_result[1]:.4f}")   # p < 0.05 => stationary

# First difference if needed
diff1 = series.diff().dropna()
adf_diff = adfuller(diff1)
print(f"ADF p-value (diff=1): {adf_diff[1]:.4f}")

# --- Step 2: ACF / PACF plots to choose p and q ---
fig, axes = plt.subplots(1, 2, figsize=(12, 4))
plot_acf(diff1, lags=20, ax=axes[0])
plot_pacf(diff1, lags=20, ax=axes[1])
plt.tight_layout()
plt.show()

# --- Step 3: fit ---
model = ARIMA(series, order=(2, 1, 1))   # p=2, d=1, q=1
result = model.fit()
print(result.summary())   # AIC, BIC, coefficient estimates

# --- Step 4: diagnose residuals ---
result.plot_diagnostics(figsize=(12, 8))
plt.show()

lb = acorr_ljungbox(result.resid, lags=[10], return_df=True)
print(lb)   # p-value >> 0.05 => residuals look like white noise

# --- Step 5: forecast ---
forecast = result.forecast(steps=12)
print(forecast)

conf_int = result.get_forecast(steps=12).conf_int()
print(conf_int)To make it concrete, here is the fit-and-forecast core run on a synthetic trending series (an ARMA process plus a slow upward drift, so it genuinely needs d=1):
import numpy as np, pandas as pd

from statsmodels.tsa.arima.model import ARIMA

# Synthetic series with trend (built to need one difference)
np.random.seed(3)
s = build_synthetic_series()          # 180 monthly points, trend + ARMA structure

result = ARIMA(s, order=(2, 1, 1)).fit()
print("AIC:", round(result.aic, 1))

fc = result.get_forecast(steps=18)
mean, ci = fc.predicted_mean, fc.conf_int()   # point forecast + 95% band
AIC: 505.0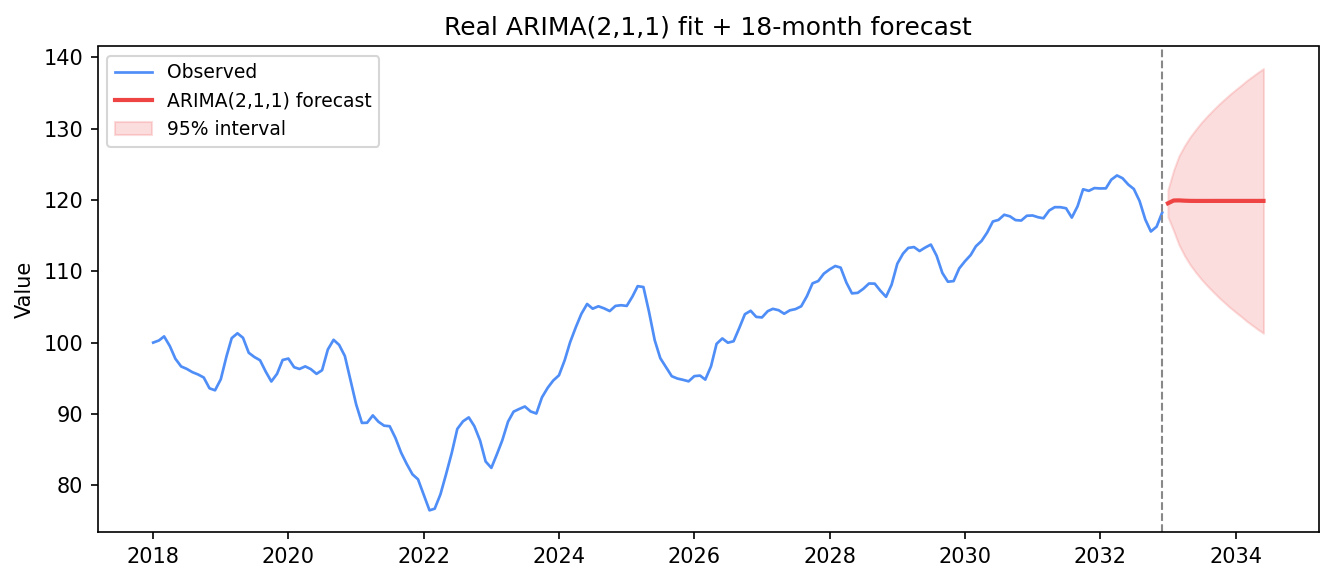
A genuine ARIMA(2,1,1) forecast: the red point forecast settles near the recent level while the 95% band fans out — uncertainty growing the further ahead you look.
Two things to read off that band. It widens with horizon — the model is honest that month 18 is far less certain than month 1.
And the point forecast quickly flattens toward a level rather than continuing any short-term wiggle, because ARIMA reverts to the mean of the (differenced) process at long range. Never over-interpret a far-out point forecast; the band is the real message.
Reading .summary()
The summary table includes:
- coef — estimated AR and MA coefficients.
- P value — whether each coefficient is statistically significant.
- AIC / BIC — use these to compare competing orders; lower wins.
- Ljung-Box (Q) — the null is no autocorrelation; a large p-value here is what you want.
Auto-selection with pmdarima
from pmdarima import auto_arima

auto_model = auto_arima(
    series,
    seasonal=False,
    information_criterion="aic",
    stepwise=True,
    trace=True,
)
print(auto_model.summary())
auto_arima runs ADF tests internally, tries many (p, d, q) combinations, and returns the lowest-AIC model. Always verify the residuals even when using auto-selection.
Seeing forecast extrapolation intuitively
The playground below uses only NumPy and Matplotlib. It fits a simple linear extrapolation on a synthetic trending series and plots the forecast as a naive intuition-builder — not a real ARIMA fit. The widening band represents how uncertainty grows with horizon.
import numpy as np
import matplotlib.pyplot as plt

rng = np.random.default_rng(42)

# Synthetic series: linear trend + noise
t = np.arange(60)
series = 2.0 * t + rng.normal(scale=8, size=60)

# Naive "forecast": extend the linear trend estimated from the last 30 points
fit_window = series[-30:]
x = np.arange(30)
slope, intercept = np.polyfit(x, fit_window, 1)

horizon = 20
h = np.arange(1, horizon + 1)
forecast = slope * (30 + h) + intercept

# Growing uncertainty band (simplification: grows as sqrt of horizon)
sigma = np.std(fit_window - (slope * x + intercept))
band = 1.96 * sigma * np.sqrt(h)

fig, ax = plt.subplots(figsize=(9, 4))
ax.plot(t, series, color="#4f8ef7", label="Observed series")
f_t = t[-1] + h
ax.plot(f_t, forecast, color="#f7954f", linewidth=2, label="Forecast")
ax.fill_between(f_t, forecast - band, forecast + band,
                color="#f7954f", alpha=0.25, label="95% interval")
ax.axvline(t[-1], color="#888", linestyle="--", linewidth=1)
ax.set_title("Naive linear extrapolation — uncertainty widens with horizon")
ax.set_xlabel("Time step"); ax.set_ylabel("Value"); ax.legend()
plt.tight_layout()
plt.show()
print("Slope:", round(slope, 3), "| Intercept:", round(intercept, 3))
Slope: 1.934 | Intercept: 61.867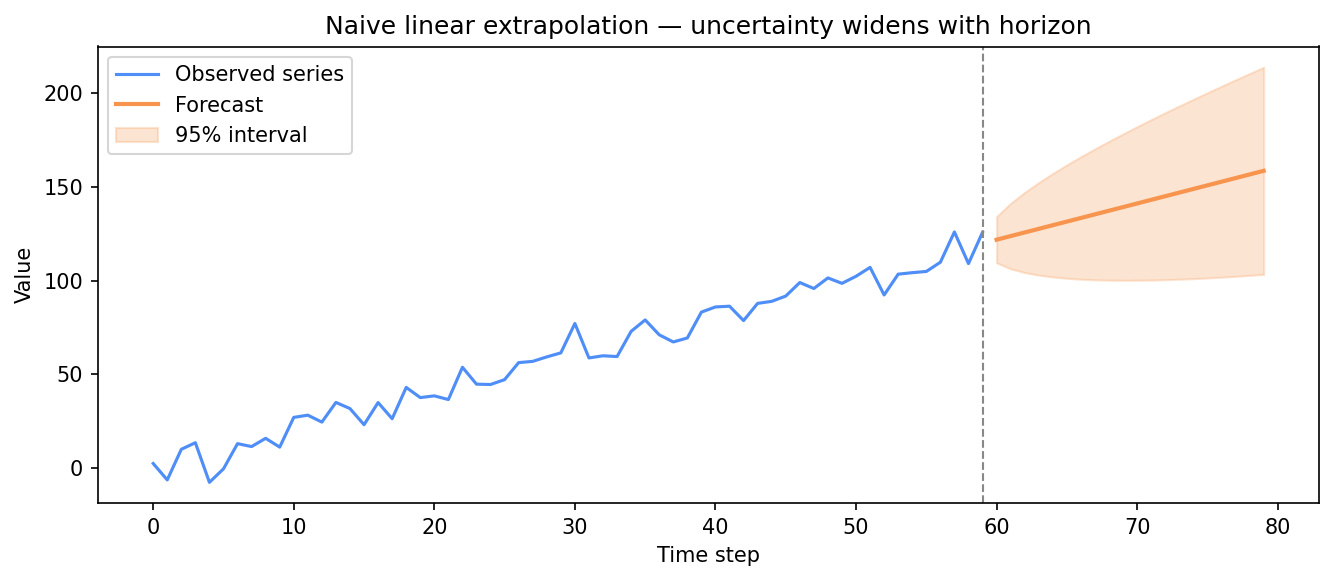
A toy linear extrapolation (slope ≈ 1.93). The band is narrow at step 1 and fans out by step 20 — uncertainty grows with horizon, just like a real ARIMA forecast.
The recovered slope (≈ 1.93) sits close to the true 2.0, and the confidence band fans out as you go further into the future.
That is exactly how a real ARIMA forecast behaves: the further out you forecast, the less certain the model is.
In one breath
ARIMA(p, d, q) = AutoRegressive Integrated Moving Average: difference the series d times to make it stationary, fit AR(p) on past values and MA(q) on past errors, then integrate (cumulative-sum) the forecasts back to the original scale.
Fit it with the Box-Jenkins loop:
- stationarise
- identify
p,qfrom ACF/PACF - fit by maximum likelihood
- diagnose the residuals
- forecast
The step beginners skip is the diagnosis: residuals must look like white noise (flat residual ACF, large Ljung-Box p-value), because a good AIC with autocorrelated residuals is still a bad model.
Use AIC/BIC (lower wins) to rank candidate orders, auto_arima as a starting search. Remember forecasts revert to the mean far out — read the widening band, not the point.
Practice
Quick check
A question to carry forward
Look at where ARIMA quietly fails — the last practice question is the tell. Fit a clean ARIMA to daily data and a stubborn spike reappears in the residual ACF at lag 7; on monthly data it returns at lag 12.
That’s the diagnosis step doing its job: it’s flagging a pattern ARIMA structurally cannot capture. The December bump from the very first time-series lesson never went away — plain ARIMA just has no vocabulary for “every 12 steps.”
So the question to carry forward is: how do you give the model a way to learn a seasonal rhythm — a correlation not with last month, but with the same month last year?
The next lesson, SARIMA, adds a second, seasonal (P, D, Q) triple operating at the seasonal period, so the model can finally difference “versus last December,” not just “versus last month” — and that lag-12 residual spike disappears.
Practice this in an interview
All questionsChoose d by differencing until the ADF test confirms stationarity; choose p from the PACF cutoff and q from the ACF cutoff on the differenced series; then confirm with AIC or BIC to guard against over-fitting. In practice, an automated grid search over a small range of candidates with information criteria is more reliable than visual inspection alone.
A Vector Autoregression (VAR) model extends ARIMA to multiple time series simultaneously: each variable is regressed on its own past values and the past values of all other variables in the system. Use VAR when the series have mutual predictive relationships (Granger-causality) and you want to model those interactions; ARIMA is sufficient when one series can be forecast in isolation.
ARIMA(p,d,q) models non-seasonal series by combining autoregression, differencing, and a moving average of errors. SARIMA extends it with a second set of seasonal parameters (P,D,Q,s) that operate at the seasonal lag s, handling periodic patterns that ARIMA alone cannot capture.
Prophet is a curve-fitting model that decomposes the series into trend, seasonality, and holidays; it handles missing data, multiple seasonalities, and non-uniform time grids with minimal tuning and is accessible to non-statisticians. ARIMA is a statistical model based on autocorrelation structure; it is more appropriate when the series is short, noise is small, and you need principled uncertainty intervals from an explicit stochastic process.